
Hard Creases In Vinyl? A Guide to Removing Banner Creases
There’s nothing quite as frustrating as unrolling a beautiful banner, ready to showcase your brand or celebrate an event, only to be met with a network of stubborn creases and wrinkles. Those fold lines can make even the most professional design look amateurish and detract from your message. But don’t despair! With a little know-how and the right technique, you can banish those creases and have your banner looking crisp and pristine in no time.
Before we dive into the methods, it’s crucial to identify what kind of banner you have. Most banners are made from either vinyl (a durable, flexible plastic material) or fabric (typically polyester or nylon). Knowing this will help you choose the safest and most effective approach.
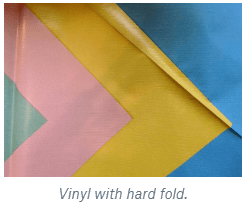
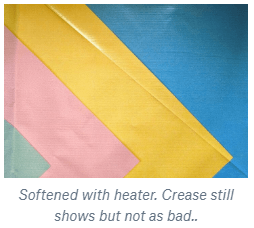
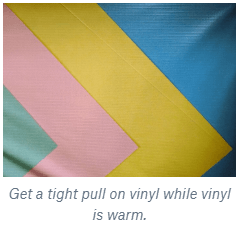
The vinyl acts best to heat so laying it out on hot concrete or heating the material the stretching the vinyl our will soften those creases. Below are some photos to show you the before and after of using these methods.
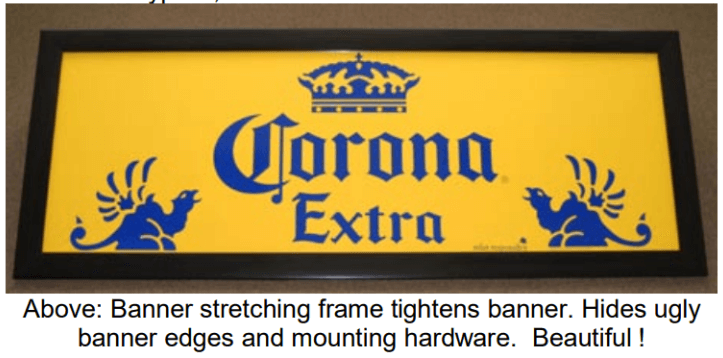
Banner frames can also make the vinyl look smooth and fresh. Check out Banner Grip frames to help you present a creaseless look.
The Golden Rule: Gentle Heat & Tension
The secret to crease removal lies in gently warming the banner material to relax its fibers or vinyl, allowing it to “remember” its original flat shape. The key word here is gentle – too much heat can warp, melt, or damage your banner permanently!
Here are our top methods for a smooth, wrinkle-free display:
Method 1: The Sun & Stretch (Best for Vinyl Banners)
This is hands-down the safest and often most effective method for vinyl banners, as it provides even, gentle heat without direct contact.
-
Find a Sunny Spot: Lay your banner flat on a clean, smooth surface (a driveway, a large table, or a clean floor) in direct sunlight. Make sure the printed side is facing up if it’s a sunny but not scorching day, or you can lay it printed-side down on a clean tarp or sheet if you’re concerned about fading.
-
Add Gentle Weight: Place heavy, flat objects like books, smooth tiles, or clean bricks strategically along the creased areas. Avoid sharp objects that could indent the banner.
-
Hang & Weight (Optional): If your banner has grommets, you can hang it tautly in the sun. Attach light weights (like half-filled water bottles or small sandbags) to the bottom grommets. Gravity combined with the sun’s warmth will work wonders.
-
Wait and Watch: Allow the banner to warm up for 2–4 hours. The combination of heat and tension will gradually pull those creases out.
-
Cool Flat: Once the creases are gone, let the banner cool completely in its flat or hanging position before moving it.
Method 2: The Steamer Sensation (Great for Fabric & Deeper Vinyl Creases)
A garment steamer is a fantastic tool for crease removal, as it delivers controlled moisture and heat without direct, scorching contact.
For Fabric Banners:
-
Hang the fabric banner vertically.
-
Use your garment steamer directly on the back (non-printed) side of the banner. Keep the steamer head moving in slow, steady strokes, allowing the steam to relax the fibers.
For Vinyl Banners:
-
Hang the vinyl banner vertically.
-
Crucially, keep the steamer head 4-6 inches away from the vinyl surface. Do NOT let the steamer touch the banner directly, as it can cause warping or bubbling.
-
Move the steamer in a sweeping motion over the creased areas.
-
Immediately wipe away any condensation with a soft, clean cloth to prevent water spots.
Method 3: The Hair Dryer Hack (Perfect for Targeted Wrinkles)
Got a few stubborn, hard-to-reach creases? Your hair dryer can be your best friend for precision work.
-
Set to Low/Medium: Always use your hair dryer on the lowest or medium heat setting. High heat is the enemy!
-
Target the Back: Hold the hair dryer about 6-8 inches away from the back side (non-printed) of the banner, directly over the crease.
-
Smooth and Soothe: As the material warms and softens, use your free hand (or a soft, clean cloth) to gently smooth and press the crease flat.
-
Cool Flat: Once the crease is gone, allow that section to cool completely while still flat to set the new, smooth shape.
Method 4: The Ironing Intervention (Use with EXTREME Caution)
This is your last resort and should only be attempted if other methods fail. Direct ironing carries the highest risk of irreversible damage.
-
Never Direct: Absolutely never let a hot iron touch the banner surface directly.
-
The “Buffer” Layer: Place a thin, clean, damp cotton towel or a bedsheet over the back side of the banner. This acts as a crucial protective barrier.
-
Lowest Heat Setting: Set your iron to the absolute lowest heat setting, typically labeled “Silk” or “Synthetics.”
-
Keep Moving: Keep the iron moving constantly over the towel-covered area. Do not stop in one spot for even a few seconds, as this can melt or deform the banner material underneath.
-
Check Frequently: Lift the towel and check your progress often.
Important “Don’ts” to Remember:
-
Don’t heat the printed side directly: Always apply heat to the back of the banner to protect the ink and graphics from heat damage or fading.
-
Don’t use high heat: Most banner materials are sensitive to heat. Low and slow is the way to go!
-
Don’t fold for storage: Once you’ve successfully de-creased your banner, roll it loosely around a cardboard tube or core. This is the best way to prevent future creases and keep your banner looking its best for years to come.
Time to Roll Out a Perfect Display!
With these techniques, those frustrating creases will be a thing of the past. Go ahead, unroll your perfectly smooth banner and let your message shine!
Do you have any secret crease-removal tips? Share them in the comments below! —
Here’s an image of a perfectly smooth, uncreased banner, ready for display.